I was working on a project for graduate school recently and wanted to document some interesting lessons learned from the assignment. The assignment required us to implement a rudimentary clickjacking attack.
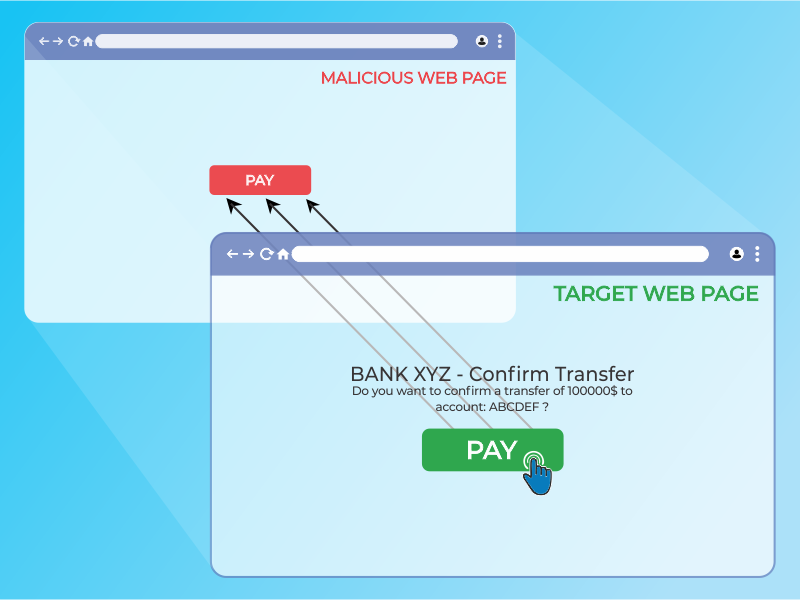
Clickjacking is a term used for attacks that trick unsuspecting users into interacting with a malicious website unknowingly. The attack - otherwise known as a “UI redress attack” is when an attacker uses multiple transparent or opaque layers to trick a user into clicking on a button or link on another page when they were intending to click on the top level page. In other words, the attacker presents a real (or lookalike) website to the user, but erects a barrier between the site and the user’s point of interaction (mouse, keyboard), so as to trick the user into actually interacting with malicious content.
In this instance, there was a model e-commerce website that we were given, along with a malicious html (malicious.html) file that would serve as the user’s starting point. For learning purposes, we made the following assumptions:
- The user was already logged into the e-commerce website (so that we didn’t have to implement a method of bypassing authentication).
- The website did not have any kind of framebusting mitigations implemented (so that we didn’t have to implement a method for circumventing these anti-clickjacking techniques).
- The user had already been tricked into believing our starting malicious.html webpage was authentic (so that we didn’t have to execute a phishing / social engineering campaign to get users to interact with the website).
Additionally, this attack would be implemented as a “blackbox” attack. In otherwords, I would not get to see the inner-workings of the backend source code for the e-commerce site; instead, I would have to infer the backend code based upon the site’s behavior with my own interactions with it.
Before going into further detail about how I went about implementing this attack, I want to preface that I do not have a background in web development. While I am familiar with network penetration testing techniques (I am in the midst of studying for my Offensive Security Certified Penetration Tester - OSCP - certification), the techniques involved with that certificate differ substantially from what was required for this attack. In addition, in order to maintain alignment with my Graduate School’s Academic Integrity policy, I have redacted significant segments of code - highlighting only the aspects I felt were pertinent for the lessons learned.
L1: Same Origin Policy
The first lesson I had to learn was orienting to the problem. The instructors and teaching assistants had provided us enough code out of the box to setup our starting attack vector. The malicious.html website was a simple search field that would query the e-commerce website (shop.html), returning the list of products that related to the user’s search (as though they had searched for the products on shop.html directly). The key difference between the search results on malicious.html and shop.html was that shop.html was framed within the malicious website using an iframe. In other words, the user was seeing the actual results of their search from shop.html, but they were not on shop.html’s domain.
Why does this matter?
Since this is a “blackbox” attack, I do not have direct access to shop.html; I cannot change the page directly. I can, however, alter the scripts and code on malicious.html as much as I’d like. There are some noteworthy limitations: first, while I can change malicious.html to my heart’s content, modern websites and browsers have implemented Same Origin Policy (SOP), which prevents me from modifying shop.html’s code, despite it being embedded on my (malicious.html) website.
SOP is a critical security mechanism that restricts how a document or script loaded from one origin can interact with a resource from another origin. Two URLs have the same origin if the protocol, port, and host are the same for both:
In short, even though I have framed shop.html inside of malicious.html and I have control of the latter, I won’t be able to dynamically implement any clickjacking overlays atop the framed shop.html results (because I can’t access the Document Object Model [DOM] of shop.html).
L2: Cross-Site Scripting (XSS)
Despite the limitation described in the first lesson, it still would be possible for me to statically create a frame (or multiple frames) on top of the search results. For example, I could create one massive overlay that - regardless of where the user clicked within the browser window - would execute something malicious.
However, the project’s specifications required a more nuanced attack. Specifically, I was tasked with creating overlays atop all of the “info” buttons that appeared for each product in the search results; this way, when the user thinks they are clicking the “info” button to learn more about the product, they instead purchase the item.
In the example product page above, I would want the clickable product names under the “Name” column to - instead of opening a page with more info about that particular product - purchase that item instead.
There is no direct way of performing this action. While there are some limited means of interacting between a top level page and an iframe, modern day web security prohibits the top level page from tampering with or altering the data contained within an iframe from another origin (see above). In order to do this, one would need to be able to inject some script directly into shop.html itself.
As it turns out, this was possible through URL XSS (or DOM XSS). The DOM is a convention used to represent and work with objects in an HTML document. All HTML documents have an associated DOM that consists of objects, which represent document properties from the point of view of the browser. For example, let’s say there is a dashboard configured for our user (let’s call them victim) at:
http://www.market.com/shop.html?context=victim
If the page doesn’t properly sanitize input in the URL, an attacker can inject their own script (or several scripts) to be executed as such:
http://www.market.com/shop.html?context=victim&<script>SomeJavascript</script>
The victim browser receives this URL and sends an HTTP request to http://www.market.com and receives a static HTML page. The browser than begins building the DOM of the page and populates the document.URL property with the URL above. In parsing the HTML page, it reads the and runs it, extracting the malicious content from the document.URL property. The browser then updates the raw HTML body, finds the javscript code in the dynamically created page, and executes it.
I would come to learn that my browser (Firefox) didn’t care for certain characters in the URL, so I would need to URL encode my input. Other than that however, I was free to inject whatever script I wanted to dynamically alter the page that was loaded into my iframe.
L3: The Payload
Now that I had captured the shop.html results within malicious.html as an iframe and I found a DOM XSS vulnerability, the rest of the work was an exercise in web development (namely: Javascript).
Initially, I noticed that my XSS injection script wasn’t returning back control of the DOM. I would attempt inject something like < script >alert(document.getElementsByTagName(“div”)< /script >, which should return an HTMLcollection object (which behaves similarly to an array); while it would, the object would be empty (value [0] would be null). This was odd, because after I closed the alert, I could run the same command in the console. It dawned on me that this is because the script it executing before the DOM has finished constructing the page. To that end, I leveraged the window.onload command, which would effectively delay a function from executing until after the DOM was loaded.
<script>
  someFunction(){};  //the function will contain the malicious contents
  window.onload = someFunction;  //although the script is called, the function will only run AFTER the DOM is finished being constructed
</script>
Now that I had direct access to the DOM, I could do some basic variable assignments to access the appropriate values within the shop.html products list table with a for-loop:
someFunction(){
  var tr = document.getElementsByTagName("tr");  //this grabs the table by the tag "tr"
    for (i=1; i<tr.length; i++){  //this iterates over each row in the table
      var productName = tr[i].getElementsByTagName("td")[#].innerHTML;  //Grabbing the particular cell within the table (change the # value to whatever column number we want to clickjack)
      //Other values we may need in order to complete the purchase should also be grabbed, such as price
    };
};
To create the overlay, I needed to append an < a > element to the < td > cell, and then insert a < div > within that. Then, once the overlay was created, I used the onclick attribute in order to call a function that would purchase the product. The constructed HTML would look something like this:
<td>
  <a onclick="buy(this)" data-productName="tshirt">
    <div>
    </div>
  </a>
</td>
Again, I am omitting the details of the Javascript I used to construct this, including the scripted CSS I assigned using div.setAttribute to render the clickjack <div> transparent. Additionally, HTML5 allows me to assign my own attributes to any elements (hence, data-productName); this is necessary because when the buy(this) function is called, this doesn’t have access to global variables or the DOM, so it’s necessary to pass them via attributes.
Finally, I implemented the buy(this) method, which would actually perform the purchase, using the attribute(s) I passed within the < a > element:
<script src="https://code.jquery.com/jquery-3.3.1.min.js"></script>
<script>
  function buy(e){
    var product = e.getAttribute('data-productName');
    //other variables passed by e
    $.ajax({
      method:"POST",
      url: "http:www.market.com/shop.html",
      data: {
        'product_name': product,
        //other variables passed by e
      }
      }).done(function(){
        console.log("success");
      }).fail(function(){
        console.log("failure");
    });
  };
  function someFunction(){
    //code that sets up the <a> and <div> elements
    //code that has the <a> element onclick="buy(this)"
  };
  window.onload = someFunction;
</script>
In the code block above, the buy(e) function pulls the data passed to the < a > element (i.e. the attributes I made up with the prefix data-). It then makes a POST request to the e-commerce website using ajax, which is included in the jquery library. This is what causes the actual purchase to occur (and is the malicious activity that the clickjacking attack conducts).